
Gypsum board installation in Ajman 0543747022
Gypsum Board Installation in Ajman 0543747022
Understanding Gypsum Board
Gypsum board installation in Ajman is highly sought after due to the material’s proven reliability and versatility. Gypsum board, also known as drywall, has been used since the late 19th century and remains a key component in modern construction. Its popularity stems from being affordable, fire-resistant, and offering excellent acoustic performance for walls and ceilings.
Gypsum board installation in Ajman 0543747022
Gypsum itself is a naturally occurring mineral, and when processed, it creates a board that is both lightweight and durable. Here are a few characteristics that make gypsum board a preferred choice in Ajman and beyond:
- Versatility: Gypsum boards can be used in various applications, including residential homes, commercial buildings, and even industrial settings.
- Ease of Installation: Unlike traditional plaster, gypsum boards are easier and quicker to install, making them a preferred choice for contractors.
- Fire Resistance: Most gypsum boards are designed to be fire-resistant, which enhances safety in buildings.
- Soundproofing: Many compositions of gypsum board offer excellent sound insulation, which is particularly beneficial in multi-family dwellings.
- Affordability: Cost-effective compared to other wall construction materials, making it favorable for large projects.
Understanding these features can significantly aid homeowners and constructors in making informed choices for their projects. Given Ajman’s rapid development, knowing what gypsum board entails becomes essential for those involved in building or renovating properties.
Importance of Proper Installation
The significance of proper gypsum board installation cannot be overstated. Though it may seem simple, improper installation can lead to a myriad of issues that compromise both the aesthetics and functionality of spaces. For example, consider a new residential building in Ajman where the gypsum board was installed hastily, without following the right procedures. Over time, this could lead to visible cracks, sagging, or even mold growth in humid conditions—problems that could have been easily avoided with a meticulous installation process.
Here are some compelling reasons to prioritize proper installation of gypsum boards:
- Structural Integrity: Gypsum boards must be mounted correctly to ensure they adhere to building standards. An improper fit can cause walls to buckle or bow over time, leading to serious structural risks.
- Aesthetic Appeal: Even the highest quality gypsum boards can appear unsightly if not installed correctly. Flaws at seams, misaligned edges, or unevenly finished surfaces can detract from the overall look of a room. Proper installation contributes to a clean, professional finish that enhances visual appeal.
- Cost-Efficiency: The cost of fixing an improperly installed gypsum board can often outweigh the initial savings from a cheap installation. When errors occur, materials must be replaced, and additional labor is required, which drives up overall project costs.
- Moisture Control: Gypsum boards are susceptible to moisture, leading to mold and mildew if not installed in moisture-prone areas. By using the right types of boards and ensuring proper sealing and finishing, homeowners can prevent these issues effectively.
- Safety Concerns: As mentioned earlier, gypsum boards can provide fire resistance, but this only holds true if they are installed correctly. In an emergency, poorly installed boards may not perform as intended, potentially jeopardizing lives.
- Maintenance Ease: Proper installation sets the groundwork for easier maintenance. Well-installed gypsum boards are smoother and thus less prone to damage during routine cleaning or renovations.
In Ajman, where the climate can vary—from hot summers to the occasional humid spells—understanding and emphasizing the importance of quality installation becomes even more critical. Homeowners should consider working with seasoned professionals who are familiar with local building codes and standards to achieve results that last.

Gypsum board installation in Ajman 0543747022
In conclusion, understanding gypsum board and recognizing the importance of proper installation sets the foundation for successful projects, whether in residential or commercial spaces. As development expands in areas like Ajman, having knowledgeable contractors in gypsum board installation ensures that properties remain durable, attractive, and safe for years to come.
With this knowledge, anyone embarking on a construction project can appreciate the subtleties of gypsum board installation. The next step involves thorough preparation and gathering the right tools and materials, a topic that we will explore further in the following section.
Preparing for Gypsum Board Installation
After grasping the fundamentals of gypsum board and the importance of proper installation, it’s time to prepare for the actual installation process. This begins with equipping yourself with the necessary tools and materials, along with accurately measuring and cutting the boards. A little preparation can make a world of difference in achieving a smooth and successful outcome.
Necessary Tools and Materials
Before diving into installation, having the right toolbox can simplify your work immensely. Here’s a checklist of essential tools and materials you will need for gypsum board installation:
Essential Tools:
- Utility Knife: A good sharp utility knife is essential for scoring and cutting the gypsum boards.
- Drywall Saw: For more intricate cuts, such as around electrical outlets and corners, a drywall saw works wonders.
- T-Square: This will help in marking straight lines and ensuring precise cuts across the board.
- Drill with Drywall Bits: A power drill is necessary for securing boards with screws, making the job easier and quicker.
- Drywall Lift: If you’re working alone or installing ceiling panels, a drywall lift could save your back from straining.
- Tape Measure: An accurate tape measure is critical for measuring both the boards and the space where they will be installed.
- Straight Edge Ruler: Useful for drawing straight lines and making aligned cuts.
- Sanding Sponge: For smoothing the edges post-installation.
- Joint Knife: Tools like these are necessary for taping and mudding the joints once the boards are up.
Materials:
- Gypsum Boards: The primary material, available in various sizes and thicknesses depending on your specific needs (e.g., moisture-resistant boards for bathrooms).
- Screws: Make sure to use appropriate fasteners; typically, drywall screws are most advisable.
- Joint Tape: This helps to reinforce the seams where two boards meet, providing a smoother finish.
- Joint Compound: Commonly referred to as mud, this is used to fill joints and provide a smooth surface for painting later.
- Primer Paint: This is necessary for preparing the surface before applying the final coat of paint.
Personal Anecdote: I recall a project where my team and I underestimated the amount of joint compound needed. As a result, we had to make an unexpected trip to the store, which delayed the project. Always have extra materials on hand to avoid hiccups!
With the right tools and materials in your arsenal, you are well-equipped to make the installation process efficient and effective.
Measuring and Cutting the Boards
Sadly, an installation that begins without precise measuring and cutting can lead to a frustrating experience. Smooth, clean cuts combined with an exact fit make the installation flow much more seamlessly. Here is a step-by-step guide to measuring and cutting your gypsum boards:
- Measure the Area: Start by measuring the height and width of the walls or ceiling where the gypsum boards will be installed. It’s wise to write down these measurements to avoid confusion later.
- Plan the Layout: For best aesthetics and durability, plan how the boards will be placed. Staggering the seams—much like bricks in a wall—can enhance stability.
- Transfer Measurements: Using your T-square, mark your measurements on the gypsum board. Ensure these marks are clean and easy to see.
- Scoring the Board:
- Use your utility knife to score along your markings. Press down firmly but gently; you want a clean line without cutting completely through the board.
- A tip I learned during my first project: Score multiple times if the board is thick; this ensures a better snap.
- Snap the Board: Once you’ve scored the line, gently bend the board at the score to snap it along the line. Then use your knife to cut through the paper backing to separate the pieces.
- Cutting Holes for Outlets: If your installation requires cutting out spaces for electrical outlets or switches, carefully measure the dimensions of the outlet. Transfer these measurements to the board, score, and then cut out the section with the drywall saw.
- Check Fit Accuracy: Always double-check the fit of your cut boards in their designated area. If they do not fit perfectly, it may lead to complications during the installation phase.
By taking the time to measure and cut your gypsum boards accurately, you’re setting the stage for a successful installation, reducing frustration later on.

Gypsum board installation in Ajman 0543747022
In summary, the preparation phase is vital before undertaking gypsum board installation in Ajman. Gathering the right tools and materials, coupled with meticulous measuring and cutting, forms a strong foundation for a successful project. As we proceed, the next steps include the crucial aspects of installing the boards effectively and ensuring they are secure and stable.
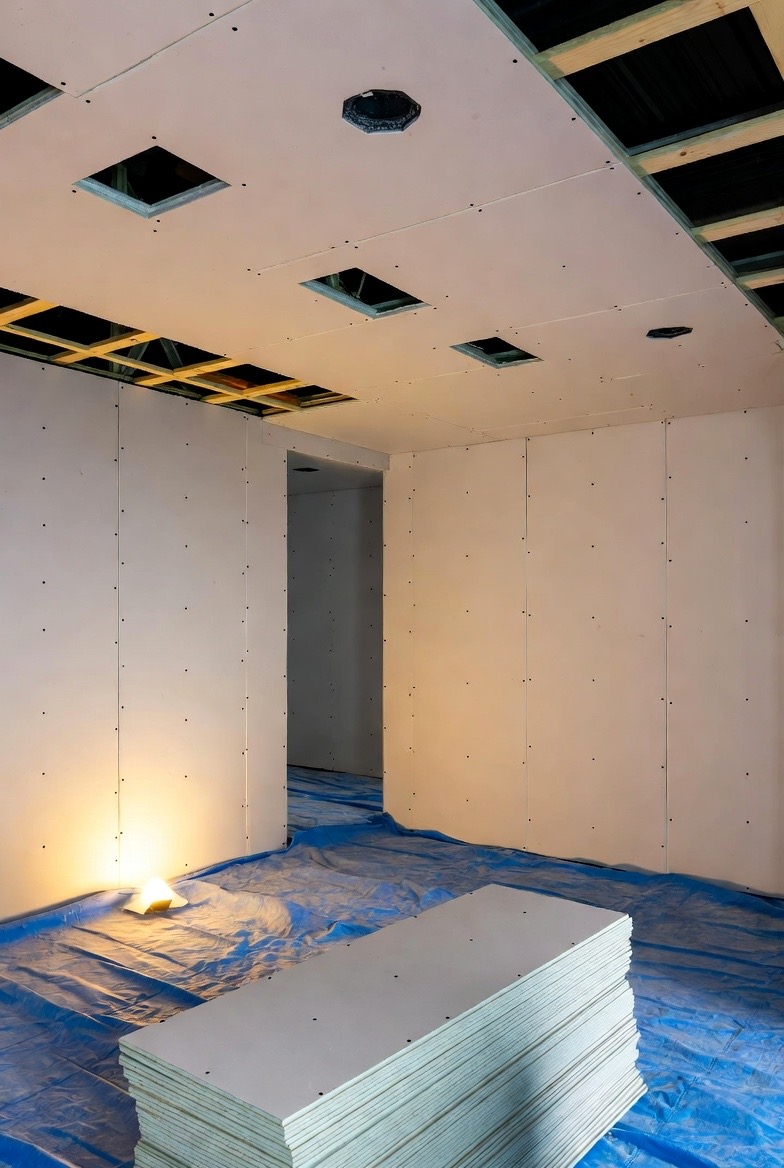
Installing Gypsum Boards
Now that you have everything prepared, from tools to properly measured and cut boards, it’s time to move on to the exciting part: installing the gypsum boards. This stage can be incredibly rewarding, as you start to see your vision take shape. We’ll cover two crucial steps in this process: securing the boards to walls and then taping and mudding the joints.
Securing the Boards to Walls
Installing gypsum boards involves fastening them securely to the walls or ceilings of your space. Here’s a simple step-by-step guide to make this process smoother:
- Positioning the Boards:
- Begin by lifting the gypsum board into place against the wall, ensuring it aligns snugly with the edges and corners.
- If you’re working on the ceiling, using a drywall lift can be a lifesaver, as it keeps the board steady while you fasten it.
- Using Drywall Screws:
- Use the drill with drywall bits to secure the boards to the studs in the wall. Beginners often wonder how far apart to space the screws. Generally, drywall screws should be placed about 16 inches apart along the studs.
- Make sure that the screw heads are slightly recessed into the board without breaking the paper surface. This tiny detail will make a huge difference when you’re finishing the surface.
- Check for Level and Straightness:
- Use a level after attaching each board to ensure it’s evenly placed. An uneven board can lead to issues down the line, especially during the finishing process.
- Staggering Joints:
- If you’re installing multiple boards, remember to stagger the joints. This means you should not align the ends of the boards from one row to the next, which adds structural strength to the wall and prevents cracks from forming later.
- Double-checking your Work:
- Once you’ve secured all the boards, it’s a good idea to walk around and inspect for any misaligned or loose areas. Rectifying these now will save time later.
Personal Anecdote: During my first DIY installation, I made the rookie mistake of tightening the screws too much, causing the board to crumple slightly. It was a hard lesson learned about the importance of just the right pressure!
With the boards securely fastened to the walls or ceilings, you’ve completed the first major step in the installation process. The next phase involves preparing the joints for a seamless finish.
Taping and Mudding Joints
Once the gypsum boards are in place, the next step is to ensure a smooth, unblemished surface. This is accomplished through taping and mudding the joints where the boards meet. Here are the steps to follow:
- Applying Joint Tape:
- Begin by applying a thin layer of joint compound (or mud) along the seams where two boards meet. Use your joint knife to spread a small amount of mud above the seam.
- Next, place the joint tape over the mud, pressing it in gently to ensure it adheres well. There are different types of tape, but paper tape tends to be the most popular for its durability.
- First Coat of Mudding:
- With the tape in place, use the joint knife to apply another thin layer of joint compound over the tape. Feather the edges of the mud to blend it smoothly into the board—this helps create an invisible seam once painted.
- Make sure not to leave any lumps or bumps—smooth, even application is key.
- Drying Time:
- Allow the first coat to dry completely before applying subsequent layers. This typically takes around 24 hours, depending on humidity levels.
- Sanding Between Coats:
- Once dry, lightly sand the area with a sanding sponge or fine-grit sandpaper to smooth any rough spots. Clean off the dust afterward to prepare for the next coat.
- Repeat the mudding and sanding process 1-2 additional times until the joints are smooth and perfectly blended with the surrounding board.
- Final Touches:
- After the last coat is dry and sanded, finish by applying primer over the mudded joints. This step is crucial as it seals the surface and prepares it for paint.
Quick Recap:
- Taping and mudding are essential to finishing the look of your gypsum boards. Properly executed, this process will hide seams and create a flawless surface that enhances the overall aesthetic of your space.
As you work through these steps, keep in mind the dedication and attention to detail you’re putting into your installation. The result will not only keep your walls looking pristine but will also provide durability that stands the test of time.
With the gypsum boards securely installed and the joints professionally finished, your next step is to focus on the finishing touches and ensuring everything meets your expectations. But before that, remember that patience is key; good work takes time and careful execution!
Finishing Touches and Inspections
With your gypsum boards securely installed and the joints expertly taped and mudded, it’s now time for the finishing touches. This stage is critical in ensuring that your walls have a professional appearance and are ready to be painted or otherwise finished. Let’s dive into the specifics of sanding and priming the boards, followed by essential inspections for quality and stability.
Sanding and Priming the Boards
After allowing your joint compound ample time to dry completely, it’s time to move forward with sanding and priming the boards. These steps will significantly impact the final aesthetic of your project. Here’s how to tackle them:
- Sanding the Joints:
- Start with a sanding sponge or fine-grit sandpaper (around 120-220 grit). Gently sand the dried joint compound where the seams were taped. The goal is to create a smooth, even surface without damaging the surrounding gypsum board.
- Use a light touch, as applying too much pressure could gouge the board or roughen the edges of the joint.
- I remember my initial sanding effort resulted in some unsightly dents on the board because I was too aggressive. A soft hand and patience are essential to achieving that flawless finish!
- Clean the Surface:
- After sanding, use a damp cloth or a vacuum with a brush attachment to clean away dust and debris. This step is crucial as any leftover dust can interfere with the primer’s adhesion.
- Priming the Boards:
- Apply a coat of primer to seal the surface. A good quality primer will help to even out the absorption rates of the board and joint compound, minimizing variations when you later paint.
- Use a roller for large areas and a brush for corners or edges. Make sure to apply the primer evenly.
- Depending on the texture and color of your final finish, two coats of primer may be necessary for a truly uniform look.
- Finishing Touches:
- After the primer has dried, you may want to lightly sand the surface again to ensure the smoothest finish. Remember, this step is about perfection, and each pass will help achieve that.
Tip: To get a sense of how the final paint will look, consider applying a small test patch of the finish paint over the primed area. This is a great way to visualize the color and ensure it blends well with your design.
Inspecting for Quality and Stability
Once you’ve sanded and primed your walls, inspecting for quality and stability is crucial before moving on to painting or further finishing. Doing these checks can help catch any issues that, if left unnoticed, could lead to complications down the line. Here’s a step-by-step guide for a thorough inspection:
- Wall Surface Inspection:
- Check the smoothness of the walls, paying attention to joints, edges, and corners. Are there any visible seams, bumps, or imperfections? Any areas that stand out should be addressed before painting—this is your opportunity for a flawless finish.
- Structural Integrity Check:
- Inspect the attachment points—gently push or pull on the gypsum boards without damaging them to ensure they’re firmly secured to the wall studs. If any boards feel loose, it may be necessary to add additional screws to stabilize them further.
- Moisture and Humidity Considerations:
- Given Ajman’s climate, it’s critical to make sure that the boards have been sealed and primed efficiently, especially in high-moisture areas like bathrooms or kitchens. Touch the walls and check for any dampness or mold signs, which can indicate improper installation or sealing.
- Use of Level:
- Utilize a level to ensure no boards are sagging or out of alignment. This step will help guarantee that everything is straight before you finish up with paint or other coverings.
- Overall Aesthetic Assessment:
- Stand back from the walls and get an overall visual of your work. Move slowly around the room to catch any imperfections you might have missed. Sometimes, a fresh set of eyes can reveal issues that you might have overlooked while working up close!
Final Tip: It’s often advantageous to take photos of your progress at each phase. This serves two purposes: you’ll have a visual record of your work and, in case you decide to renovate later, photographic evidence of how far you’ve come!
In wrapping up this phase, remember that taking the time to properly sand and inspect before finishing will pay off immensely. A little extra effort now will lead to stunning results in the end, and those walls will stand strong and beautiful for years to come.
With everything sanded, primed, and inspected to perfection, you’re now ready to paint or apply any decorative finishes to the gypsum boards. The journey of installation is nearing its conclusion, and each step forward is a step toward an inspiring finished space!
Common Mistakes to Avoid in Gypsum Board Installation
Now that we’ve covered the essential steps for finishing your gypsum board installation, it’s crucial to address some common pitfalls that many DIY enthusiasts and even seasoned professionals can fall into. By identifying and avoiding these mistakes, you’ll enhance the quality and longevity of your installation. Let’s explore two significant errors: not using proper fasteners and ignoring moisture and humidity factors.
Not Using Proper Fasteners
Fasteners might seem like a minor detail, but they play a pivotal role in the overall stability and durability of your gypsum board installation. Using the wrong type or size of fasteners can lead to several issues down the road. Here are some key points to consider:
- Choosing the Right Type of Fastener:
- For gypsum board, drywall screws are the preferred choice. They’re designed specifically for this purpose. Unlike nails, screws provide better holding power and are less likely to pop out over time.
- Avoid using standard wood screws or other types of fasteners that may not grip the board effectively. They can create weak points in your installation, leading to sagging or separation.
- Getting the Size Right:
- The typical length for drywall screws is about 1.25 inches for ½ inch boards and 1.5 inches for thicker boards. Using screws that are either too short or too long can lead to problems. Screws that are too short won’t anchor properly, while those that are too long may penetrate the other side of the board.
- I recall a project where I grabbed a box of screws that were slightly too short, thinking it wouldn’t matter. Only after the installation did I realize many boards weren’t secure, which necessitated a complete redo of that portion—a headache I could have avoided with a simple check!
- Spacing Matters:
- Proper spacing of fasteners is equally crucial. Screws should typically be placed about 12 inches apart along the edges of the gypsum board and about 16 inches apart in the fields (the areas away from the edges). Inadequate spacing can make the board vulnerable to popping or shifting, particularly in high-traffic areas.
- Installing at the Right Angle:
- Be sure to drive screws at a perpendicular angle to the board. Screws driven at an angle can fail to provide the same level of holding strength and may lead to cracking or damage in the future.
Quick Checklist for Proper Fastening:
- Use drywall screws specifically designed for gypsum board.
- Ensure screws are the correct length.
- Maintain proper screw spacing (12 inches on edges, 16 inches in fields).
- Drive screws straight into the board.
By giving careful consideration to the fasteners used in your installation, you’re taking an essential step toward ensuring the strength and stability of your walls.
Ignoring Moisture and Humidity Factors
Another common mistake in gypsum board installation is neglecting to consider moisture and humidity levels, which can be particularly critical in a region like Ajman, where humidity can vary significantly. Here’s why you should pay attention to these factors:
- Selecting the Right Type of Board:
- Not all gypsum boards are created equal. For areas that are prone to moisture, such as bathrooms or kitchens, it’s vital to use moisture-resistant or green board gypsum. Regular drywall can warp, swell, and develop mold when exposed to high moisture levels.
- During a past renovation, I learned this the hard way when I installed standard drywall in a bathroom without considering humidity. Within months, the boards began to show signs of mildew, forcing me to remove and replace them entirely—a costly lesson!
- Proper Installation Techniques:
- Even with moisture-resistant boards, installation methods can influence durability. Keeping gaps between the board and flooring can help reduce moisture wicking from the ground into the material.
- Always use a waterproof barrier in wet areas, like behind tiles, to further protect the drywall from moisture infiltration.
- Environment Control:
- Before installation, ensure that the work environment is appropriate. It’s wise to avoid installing gypsum boards during extreme weather conditions that could introduce excessive moisture or dryness in the material.
- After installation, maintaining a balanced indoor climate with appropriate HVAC systems will help prolong the lifespan of your walls.
- Regular Inspections:
- Once your installation is complete, make it a habit to regularly inspect for any signs of dampness, especially in summer months. Catching issues early can save significant repair costs down the line.
Moisture Management Checklist:
- Use moisture-resistant gypsum boards in high-humidity areas.
- Maintain appropriate gaps from the floor.
- Consider environmental conditions before installation.
- Conduct regular inspections after installation.
By avoiding these common mistakes—using improper fasteners and ignoring moisture factors—you set the stage for a successful drywall installation that stands the test of time. Taking simple precautions during the preparation and installation phases can lead to a finished project that not only looks great but also performs well in diverse conditions.
Armed with this knowledge, you’re now better prepared to achieve an impeccable gypsum board installation. The journey of transforming your space can be both fulfilling and productive!
Hiring Professionals for Gypsum Board Installation
If you’ve reached the point where you’re considering hiring professionals for your gypsum board installation, you’re likely weighing the pros and cons. While a DIY approach can be rewarding, enlisting the help of experts can not only save you time and effort but also contribute to a higher quality installation. Let’s explore the benefits of hiring experts and how you can choose the right service for your needs.
Benefits of Hiring Experts
When it comes to gypsum board installation, the benefits of hiring professionals can be substantial. Here are several advantages to consider:
- Expertise and Experience:
- Professional installers have extensive training and experience that allows them to handle various situations that may arise during installation. They can navigate challenges gracefully, ensuring that your project remains on track.
- For instance, I once tried installing gypsum boards in a curved wall setting, thinking I could manage it. I quickly found out how tricky it could be. A professional would have effortlessly tackled the unique angles and required cuts.
- Quality Results:
- With professionals, you can expect a higher level of craftsmanship. They know how to minimize seams, properly tape and mud joints, and leave you with a finish that’s ready for paint.
- Poor installation can lead to visible seams or imperfections that may require additional work down the line—something that professionals typically avoid.
- Time Efficiency:
- Hiring experts will usually speed up the installation process. They possess the right tools and techniques to get the job done efficiently, while a DIY approach can take significantly longer, especially for beginners.
- Remember that time is valuable. You can use the hours saved to focus on other areas of your home or even enjoy some well-deserved relaxation!
- Safety:
- Installing gypsum boards, particularly in complicated areas like ceilings, can pose safety risks. Professionals are trained in using equipment safely, reducing the chances of accidents or injuries that can occur during a DIY project.
- During my first installation, I nearly strained my back trying to lift heavy boards above my head. Professional installers are generally more skilled at managing heavy materials safely.
- Access to Proper Tools:
- Experts come equipped with the right tools for the job, which means you won’t have to invest in specialized equipment that you might only use once. This can save you money in the long run and eliminate the clutter of tools you don’t need.
- Guarantee and Warranty:
- Many professional installation services offer warranties on their work, providing you with peace of mind. Should an issue arise after installation, you can rest assured knowing they’ll handle it at no additional cost.
Overall, hiring professionals not only enhances the quality of your project but also simplifies the process, making it a strong consideration for anyone looking to improve their spaces.
How to Choose the Right Installation Service
Once you’ve decided to go the professional route, the next crucial step is selecting the right installation service to meet your needs. Here’s a comprehensive guide to help you navigate this decision:
- Research and Recommendations:
- Begin by seeking recommendations from friends, family, or neighbors who have had positive experiences. Word-of-mouth referrals often yield trustworthy professionals.
- You can also use online platforms to read reviews and check the ratings of local contractors. Websites like Google Reviews or specialist platforms like Houzz can be particularly informative.
- Check Credentials:
- Verify that the installation service holds the necessary licenses, insurance, and certifications. This helps protect you from liability and ensures that the workers are qualified for the job.
- Request to see proof of insurance, as this covers any accidents or damages that may occur during the project.
- Request Quotes:
- Obtain detailed quotes from several contractors to compare costs. Make sure these quotes include labor, materials, and any other potential fees so you can assess the full financial picture.
- Be wary of quotes that seem unusually low; they may indicate a lack of experience or the use of inferior materials.
- Review Past Projects:
- Ask the contractors for samples of their previous work. This will give you an idea of their quality and style of installation.
- Look for completed projects similar in scope to yours, as this can indicate their ability to handle your specific needs.
- Communication and Professionalism:
- Pay attention to how the contractors communicate with you throughout the process. Professionalism can be a great indicator of how they will handle your project.
- A contractor who listens to your needs, answers questions thoroughly, and responds promptly is more likely to provide a satisfactory experience.
- Warranty and Support:
- Inquire about any warranties they offer on both labor and materials. A contractor who stands behind their work is often more trustworthy.
- Ask how they handle post-installation support. Will they check in after a certain period? What’s their policy if something doesn’t meet your expectations?
Conclusion
In conclusion, hiring professionals for gypsum board installation can provide myriad benefits, from expertise and quality results to enhanced safety. By conducting thorough research and following these guidelines for selecting the right service, you can ensure a smooth and successful installation. If you’re ready to transform your space with high-quality gypsum board, don’t hesitate to reach out for professional help.
With the right team on your side, you’ll enjoy the benefits of a beautiful, durable finish, leaving you with more time to relax and enjoy your wonderfully transformed space!
Comments (0)
[…] Chiller and cold room repair in Sharjah […]